
axios를 사용하여 API를 연동하겠습니다.
Axios
< axios 인스턴스 생성 >
// src/lib/api/client.js import axios from 'axios'; const client = axios.create(); /** * 글로벌 설정 예시: * API 주소를 다른 곳으로 사용함 * client.defaults.baseURL = `https://external-api-server.com/` * * 헤더 설정 * client.defaults.headers.common['Authorization'] = 'Bearer alb2c3d4'; * * 인터셉터 설정 * axios.intercepter.response.use( \ * response => { * 요청 성공 시 특정 작업 수행 * return response; * }, * error => { * 요청 실패 시 특정 작업 수행 * return Promise.reject(error); * } * ) * */ export default client;
이렇게 axios인스턴스를 만들면 나중에 API클라이언트에 공통된 설정을 쉽게 넣어 줄 수 있습니다. 사실 인스턴스를 만들지 않아도 이러한 작업을 할 수 있습니다. 하지만 인스턴스를 만들지 않으면 애플리케이션에서 발생하는 모든 요청에 대해 설정하게 되므로, 또 다른 API서버를 사용할 때 곤란해질 수 있습니다.
< 프록시 설정 >
현재 백엔드 서버는 4000포트, 리액트 개발 서버는 3000포트로 열려 있기 때문에 별도의 설정 없이 API를 호출하려고 하면 오류가 발생합니다. 이 오류를 CORS(Cross Origin Request)라고 합니다. 네트워크 요청을 할 때 주소가 다른 경우에 발생합니다. 이 오류를 해결하려면 다른 주소에서도 API를 호출할 수 있도록 서버 쪽 코드를 수정해야 합니다. 그런데 최종적으로 프로젝트를 다 완성하고 나면 결국 리액트 앱도 같은 호스트에서 제공할 것이기 때문에 이러한 설정을 하는 것은 불필요 합니다.
그 대신 프록시라는 기능을 사용할 것입니다. 웹팩 개발 서버에서 지원하는 기능입니다. 개발 서버로 요청하는 API들을 우리가 프록시로 정해 둔 서버로 그대로 전달해 주고 그 응답을 웹 애플리케이션에서 사용할 수 있게 해 줍니다.
CRA에서 만든 프로젝트는 package.json에서 서중 가능합니다.
{ "name": "blog-frontend", "version": "0.1.0", "private": true, "dependencies": { "@testing-library/jest-dom": "^5.14.1", "@testing-library/react": "^12.0.0", "@testing-library/user-event": "^13.2.1", "axios": "^0.26.1", "immer": "^9.0.12", "open-color": "^1.9.1", "react": "^17.0.2", "react-dom": "^17.0.2", "react-redux": "^7.2.6", "react-router-dom": "^6.2.2", "react-scripts": "5.0.0", "redux": "^4.1.2", "redux-actions": "^2.6.5", "redux-devtools-extension": "^2.13.9", "redux-saga": "^1.1.3", "styled-components": "^5.3.3", "web-vitals": "^2.1.0" }, "scripts": { "start": "react-scripts start", "build": "react-scripts build", "test": "react-scripts test", "eject": "react-scripts eject" }, "eslintConfig": { "extends": [ "react-app", "react-app/jest" ] }, "browserslist": { "production": [ ">0.2%", "not dead", "not op_mini all" ], "development": [ "last 1 chrome version", "last 1 firefox version", "last 1 safari version" ] }, "proxy": "http://localhost:4000" }
이제 리액트 애플리케이션에서 client.get('/api/posts')를 하게 되면, 웹팩 개발 서버가 프록시 역할을 해서 http://localhost:4000/api/posts에 대신 요청한 뒤 결과물을 응답해 줍니다.
< API 함수 작성 >
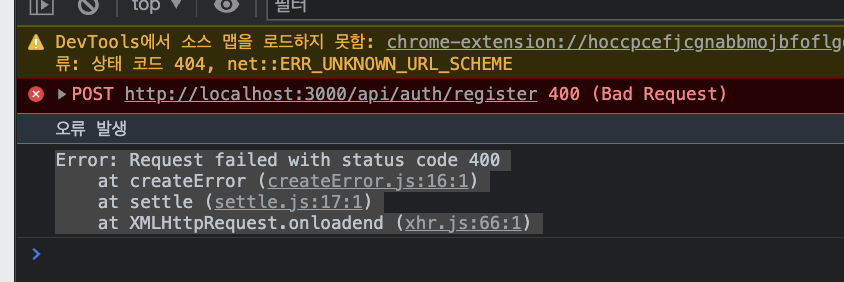
// src/lib/api/auth.js import client from './client'; // 로그인 export const login = ({ username, password }) => client.post('/api/auth/login', { username, password }); // 회원가입 export const register = ({ username, password }) => client.post('/api/auth/register', { username, password }); // 로그인 상태 확인 export const check = () => client.get('/api/auth/check');
이 코드는 이제 외부 서버에서 요청할 api를 담은 것이다. 또한 우리는 이제 react-saga로 비동기 처리를 할 것이므로 api처리를 위한 saga함수들을 작성해 보도록 하겠다.
// src/lib/api/createRequestSaga.js import { call, put } from 'redux-saga/effects'; import { startLoading, finishLoading } from '../../modules/loading'; export const createRequestActionTypes = (type) => { const SUCCESS = `${type}_SUCCESS`; const FAILURE = `${type}_FAILURE`; return [type, SUCCESS, FAILURE]; }; export default function createRequestSaga(type, request) { const SUCCESS = `${type}_SUCCESS`; const FAILURE = `${type}_FAILURE`; return function* ({ payload }) { yield put(startLoading(type)); try { const { data } = yield call(request, payload); yield put({ type: SUCCESS, payload: data, }); } catch (e) { yield put({ type: FAILURE, payload: e, error: true, }); } yield put(finishLoading(type)); }; }
이는 반복되는 사가문을 리팩토링 해서 다른 파일로 빼낸 것입니다.
// src/modules/lauth.js import { createAction, handleActions } from 'redux-actions'; import produce from 'immer'; import { takeLatest } from 'redux-saga/effects'; import createRequestSaga, { createRequestActionTypes, } from '../lib/api/createRequestSaga'; import * as authAPI from '../lib/api/auth'; const CHANGE_FIELD = 'auth/CHANGE_FIELD'; const INITIALIZE_FORM = 'auth/INITIALIZE_FORM'; const [REGISTER, REGISTER_SUCCESS, REGISTER_FAILURE] = createRequestActionTypes('auth/REGISTER'); const [LOGIN, LOGIN_SUCCESS, LOGIN_FAILURE] = createRequestActionTypes('auth/LOGIN'); export const changeField = createAction( CHANGE_FIELD, ({ form, key, value }) => ({ form, // register, login key, // username, password, passwordConfirm value, // 실제 바꾸려는 값 }), ); export const initializeForm = createAction(INITIALIZE_FORM, (form) => form); // register export const register = createAction(REGISTER, ({ username, password }) => ({ username, password, })); export const login = createAction(LOGIN, ({ username, password }) => ({ username, password, })); // 사가 생성 const registerSaga = createRequestSaga(REGISTER, authAPI.register); const loginSaga = createRequestSaga(LOGIN, authAPI.login); export function* authSaga() { yield takeLatest(REGISTER, registerSaga); yield takeLatest(LOGIN, loginSaga); } const initialState = { register: { username: '', password: '', passwordConfirm: '', }, login: { username: '', password: '', }, auth: null, authError: null, }; const auth = handleActions( { [CHANGE_FIELD]: (state, { payload: { form, key, value } }) => produce(state, (draft) => { draft[form][key] = value; // 예: state.register.username을 바꾼다. }), [INITIALIZE_FORM]: (state, { payload: form }) => ({ ...state, [form]: initialState[form], }), // 회원가입 성공 [REGISTER_SUCCESS]: (state, { payload: auth }) => ({ ...state, authError: null, auth, }), [REGISTER_FAILURE]: (state, { payload: error }) => ({ ...state, authError: error, }), [LOGIN_SUCCESS]: (state, { payload: auth }) => ({ ...state, authErorr: null, auth, }), [LOGIN_FAILURE]: (state, { payload: error }) => ({ ...state, authError: error, }), }, initialState, ); export default auth;
우선 차례대로 createRequestActionTypes를 이용해서 action type3개를 한번에 반환 시키도록 하였습니다. 또한 당연히 REGISTER와 LOGIN액션을 실행시켜 주기위한 액션 생성함수인 register와 login을 만들어 주었습니다. 그 후에는 사가함수를 각각 만들어 주었는데 registerSaga와 loginSaga는 아까 리팩토링 하였던 createReqestSaga를 통해 사가 함수를 반환하게 했습니다. 이 사가 함수에서 api를 비동기적으로 호출하는 것입니다. 그 후에는 authSaga함수를 작성해서 둘을 takeLatest를 활용하여 불러와 줍니다.
그리고 initialState에서는 api를 불러온 결괏값을 담을 auth와 에러가 발생했을 때 이를 담을 authError을 만들어 넣어 주었습니다.그리고 각각에 사가 함수를 실행하면서 발생할 SUCCESS, FAILURE함수들에 대한 리덕스를 만들어 줍니다.
// src/modules/index.js import { combineReducers } from 'redux'; import { all } from 'redux-saga/effects'; import auth, { authSaga } from './auth'; import loading from './loading'; const rootReducer = combineReducers({ auth, loading, }); export function* rootSaga() { yield all([authSaga()]); } export default rootReducer;
// src/index.js import React from 'react'; import ReactDOM from 'react-dom'; import App from './App'; import { BrowserRouter as Router } from 'react-router-dom'; import { Provider } from 'react-redux'; import { createStore, applyMiddleware } from 'redux'; import { composeWithDevTools } from 'redux-devtools-extension'; import rootReducer, { rootSaga } from './modules'; import createSagaMiddleware from '@redux-saga/core'; const sagaMiddleware = createSagaMiddleware(); const store = createStore( rootReducer, composeWithDevTools(applyMiddleware(sagaMiddleware)), ); sagaMiddleware.run(rootSaga); ReactDOM.render( <Provider store={store}> <Router> <App /> </Router> </Provider>, document.getElementById('root'), );
그 다음에는 redux-saga미들웨어를 프로젝트에 적용을 해주는 작업입니다.
그리고 아까 설명하지 못한 loading을 관리하는 리덕스도 써줍니다.
// src/modules/loading.js import { createAction, handleActions } from 'redux-actions'; const START_LOADING = 'loading/START_LOADING'; const FINISH_LOADING = 'loading/FINISH_LOADING'; /** * 요청을 위한 액션 타입을 payload로 설정합니다. */ export const startLoading = createAction( START_LOADING, (requestType) => requestType, ); export const finishLoading = createAction( FINISH_LOADING, (requestType) => requestType, ); const initialState = {}; const loading = handleActions( { [START_LOADING]: (state, action) => ({ ...state, [action.payload]: true, }), [FINISH_LOADING]: (state, action) => ({ ...state, [action.payload]: false, }), }, initialState, ); export default loading;
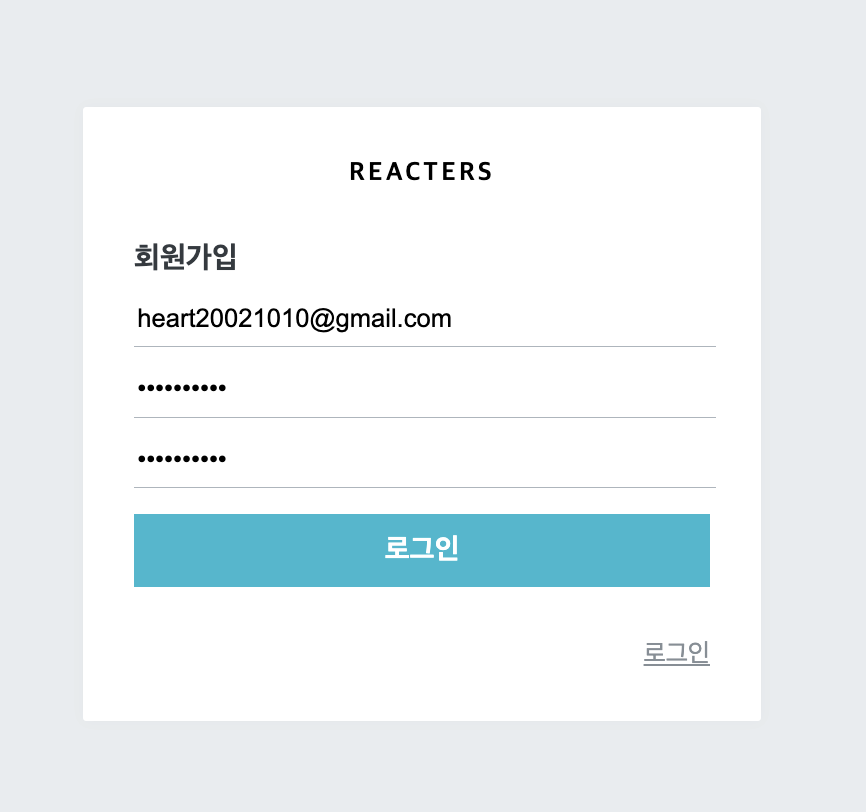
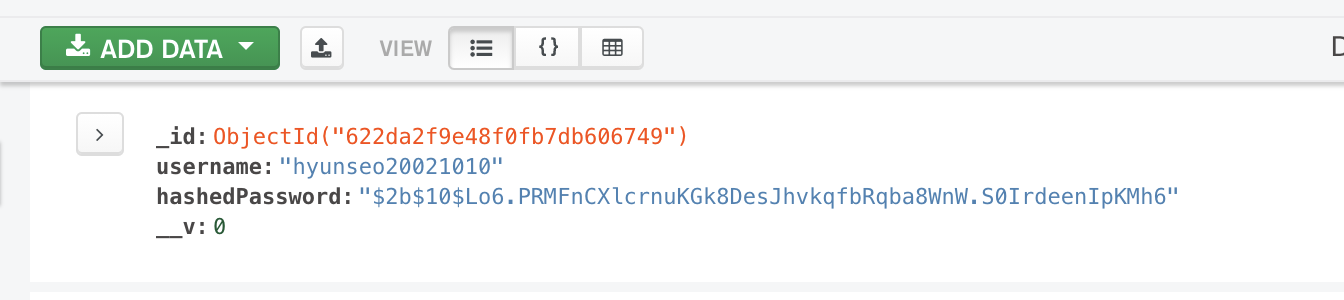
그 다음에는 RegisterForm에 register action을 발생시켜서 mongodb에 회원 정보를 저장하는 작업을 진행해 줍니다.
// src/containers/auth/RegisterForm.js import React, { useEffect } from 'react'; import { useDispatch, useSelector } from 'react-redux'; import { changeField, initializeForm, register } from '../../modules/auth'; import AuthForm from '../../components/auth/AuthForm'; const RegisterForm = () => { const dispatch = useDispatch(); const { form, auth, authError } = useSelector(({ auth }) => ({ form: auth.register, auth: auth.auth, authError: auth.authError, })); // 인풋 변경 이벤트 핸들러 const onChange = (e) => { const { value, name } = e.target; dispatch( changeField({ form: 'register', key: name, value, }), ); }; // 폼 등록 이벤트 핸들러 const onSubmit = (e) => { e.preventDefault(); const { username, password, passwordConfirm } = form; if (password !== passwordConfirm) { // TODO: 오류처리 return; } dispatch(register({ username, password })); }; // 회원가입 성공/실패 처리 useEffect(() => { if (authError) { console.log('오류 발생'); console.log(authError); return; } if (auth) { console.log('회원가입 성공'); console.log(auth); } }, [auth, authError]); // 컴포넌트가 처음 렌더링될 떄 form을 초기화함 useEffect(() => { dispatch(initializeForm('register')); }, []); return ( <AuthForm type="register" form={form} onChange={onChange} onSubmit={onSubmit} /> ); }; export default RegisterForm;
form에 해당하는 username, password, passwordConfirm을 받아서 password confirm한다음 register action parmater로 넘겨주었습니다.
'React > ReactJs' 카테고리의 다른 글
| React - React Router v6 (0) | 2022.03.18 |
|---|---|
| React - FrontEnd Project - 3 (0) | 2022.03.17 |
| React - FrontEnd Project - 1 (0) | 2022.03.15 |
| React - JWT (0) | 2022.03.13 |
| React - API의 활용을 위한 prototype (0) | 2022.03.13 |